Super-charge your WordPress Blog: Setup a CDN
· 840 wordsPerformance is important.
We get this. As blog owners if our users get frustrated then we get frustrated. In this post we’ll look at how you can move a blog’s performance and loading times to the next level. A couple of years ago we looked at how to improve a website’s loading times – this post should be more specific than that, focusing primarily on WordPress and how content is delivered to your users.
Who is this article for?
This article will be aimed at intermediate developers as we’ll be using AWS, Amazon’s cloud platform, and some technical terms will be thrown around (sorry). If you are just starting work with WordPress and increasing it’s performance then I’d recommend many other articles on basic performance increases (disabling plugins, etc).
What are we going to be focusing on?
We will be looking at moving assets, like your images, CSS and JavaScript, away from your server and onto a content delivery network supplied by Amazon, CloudFront. To do this we’ll be using a WordPress plugin to help us out called TotalCache, a free plugin covering a multitude of performance enhancements for WordPress.
Before you start you will need: an AWS account (with an API Key and Secret) and a WordPress install.
So why use a CDN? — The Benefits#
Moving these assets away from your server means that your sever doesn’t have to process these requests – even though it’s not a big job, it’s one less thing for it to do. This is sometimes combated by using an nginx server separate from your main server just to host content.
Content Delivery Networks, like CloudFront, are designed to shift your content – probably hosted in one location – to many different nodes across the planet. This moves the content nearer to users connecting to your site, thus resulting in faster load times.
Browsers often limit the number of requests to a specific domain, but by using a CDN you’re going to be using either a different domain or a chosen sub-domain. This allows for more concurrent connections and files to be downloaded.
How to Setup your Content Delivery Network#
Part 1: Install TotalCache
1. We’ll start within the WordPress Admin Panel. If you go to your plugins sections and add the TotalCache plugin. If this does not work you might have to download the plugin and upload it with FTP. Once installed also remember to activate it and on doing so you should see a new item in your sidebar called ‘Performance’.
Part 2: Setup our CDN w/ TotalCache
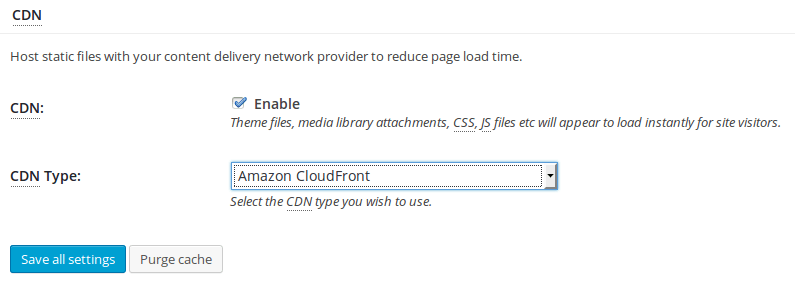
2. In this ‘Performance’ section, if we hover over it, we want to go into the ‘General’ section. In here the first thing we need to do is enable the CDN setting and configure it to use ‘Amazon CloudFront’ under the ‘Origin Pull/Mirror’ group. And once we have done that we can save it.
3. Back at the top of this page there will be a message saying we haven’t entered our key and secret – no problem, clicking ‘specify it’ link will take us to the CDN configuration page where we can enter them.
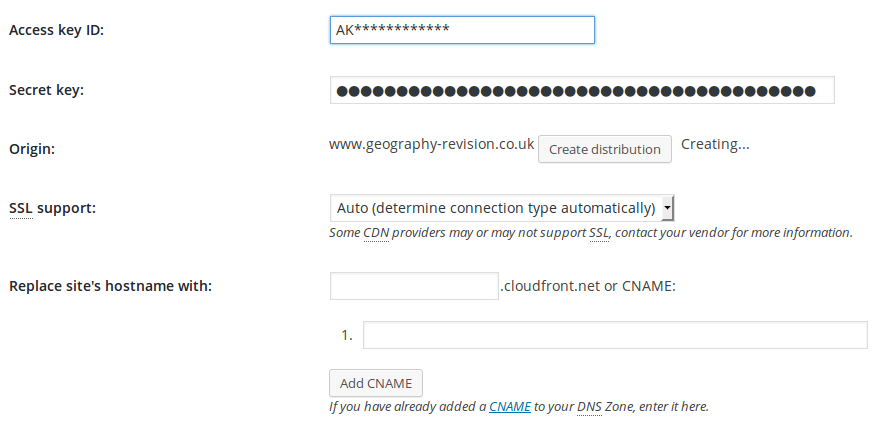
4. On this page, if you enter your key and secret – then click ‘Create distribution’ it will take a while and create your whole CloudFront setup on AWS for you. If you save those settings and then click the ‘Test CloudFront distribution’ you should find it says ‘Test passed’.
5. (Optional) normally CloudFront will give you a subdomain on it’s own domain, something like d27********.cloudfront.net, but you can choose to use your own, if only for vanity reasons, by setting up a CNAME for your domain and entering it into the CloudFront settings and within the TotalCache CDN settings. If you’re using the https protocol though and you only have an ssl certificate for the one subdomain (like www.), like Designed by a Turtle does, then you are better off piggy backing off the CloudFront domain and not using a CNAME record.
Part 3: Within the AWS CloudFront Panel

6. If you sign into your AWS account now, you should find a new entry in CloudFront, with the origin set to your WordPress install. It’s status will probably be ‘In Progress’ as it will take a while to propagate throughout their system. If we take a copy of the subdomain under the domain name section of the table, we’ll need to add it to our WordPress setup. In the text input titled ‘Replace site’s hostname with’ enter the beginning of the subdomain we just copied (it usually starts with a ‘D’).
7. Et voilà. If you go to your site now you should find your images are loading from CloudFront. If they’re not, it’s worth waiting a while to make sure they been pushed up and cached. The CDN will only work once the the status in CloudFront changes from ‘In Progress’ to ‘Deployed’.
Further Reading#
Pantheon has a good article comparing WordPress cache plugins to software like Varnish, which sits in front of your WordPress instillation.

About the Author: Edd Turtle
Edd is a PHP and Go developer, specialising in building scalable web applications. He enjoys blogging about his experiences, mostly about creating and coding new things he's working on and is a big beliver in open-source and Linux.