Getting Started with Laravel: Part 2 – The Setup
· 650 words
In our first part to our Getting Started with Laravel series we looked at how to install Laravel using Composer and Git and then used the php artisan serve command to host a web server locally. In this part we’ll be moving on to look at getting Laravel setup with a database back end and creating our first query. This part might be quite a short one as there isn’t much setup needed with Laravel before diving straight into coding (which is for the best!).
The Series:
- Part 1 – The Install
- Part 2 – The Setup
The Database#
We’ll be using MySql as our database of choice, but the setup is very similar whatever database option you go with. Laravel has Sqlite, MySql, PostgreSql and MS SQL Server support by default but can be adapted to use anything that PHP’s PDO class supports. So to begin, we’ll make sure we have everything we need by installing some packages, if you haven’t had MySql installed before hand then it will ask you for a password (remember it, we’ll need it later). More info on installing MySql here.
sudo apt-get install mysql-server libapache2-mod-auth-mysql php5-mysql
Once this has run through and you have everything needed, we can now create ourselves a new database. We’ll do this through the mysql interface (in the terminal) for now, but you can use phpMyAdmin or a GUI if you prefer.
mysql -u root -p
create database gettingstarted;
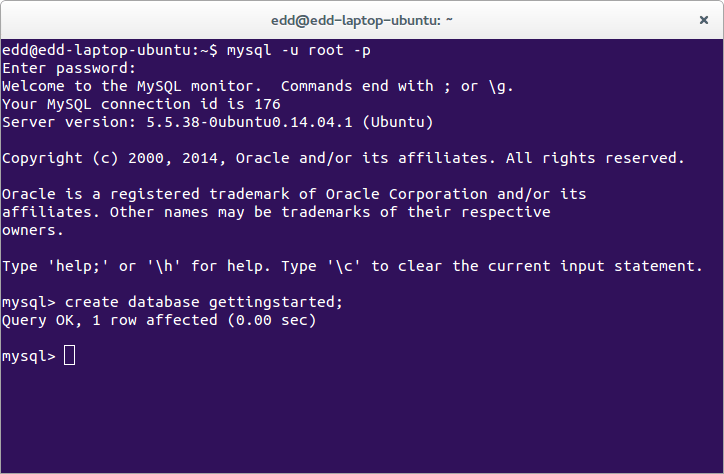
It should now report 'Query OK' to confirm it has been created.
Whilst we’re here, if we just create a table which we’ll later be inserting and selecting from, once we get into Laravel we’ll be using migrations to handle this for us.
use gettingstarted
CREATE TABLE cats (
    id int(8) NOT NULL AUTO_INCREMENT,
    name varchar(128),
    colour varchar(128),
    PRIMARY KEY (id)
) AUTO_INCREMENT=1;
Laravel’s Database Config#
Now that we have a database setup we need to tell Laravel where it is and supply it some user credentials. To do this we’ll find Laravel’s database config file app/config/database.php and scroll down to where it lists mysql details (line 55-65). We then need to change the database name to the one we created earlier so it looks something like the code below. Once we’ve changed this, if we refresh Laravel then it should have the ‘You have Arrived’ message.
'mysql' => array(
    'driver'    => 'mysql',
    'host'      => 'localhost',
    'database'  => 'gettingstarted',
    'username'  => 'root',
    'password'  => '****',
    'charset'   => 'utf8',
    'collation' => 'utf8_unicode_ci',
    'prefix'    => '',
),
Let’s get Ready to Code!#
We’re all setup and ready to go, so lets start inserting rows into our database – just to test it’s working. We’ll do this for the time being within the routes.php (found just within the app folder).
You’ll notice that there is already something in the routes file which sets our root directory to show the hello view (and the ‘You have Arrived’ message). If we change the contents of the routes file to include an insert before the return, we should now have something in our database. Note: each time you refresh your browser you’ll get a new row inserted if this is left in.
DB::table('cats')->insert(
    array('name' => 'mittens', 'colour' => 'black')
);
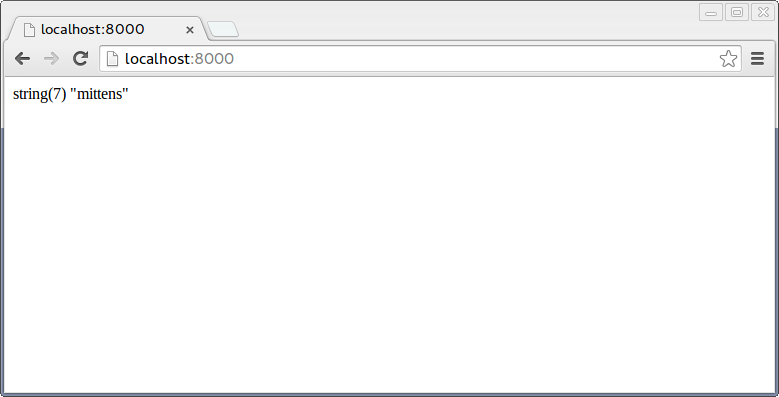
Once we’ve run this, and we have things in our database, we can replace the insert code above with a select statement to get all the rows.
$cats = DB::table('cats')->pluck('name');
dd($cats);
The dd() method will var_dump() a variable then exit out of the execution with the die() function – super useful for quickly seeing the contents of a variable. In this example, when we refresh our browser, we get string(7) "mittens".
We’re not going into too much detail here on how databases work it just illustrates that Laravel is all set up and working.
Stay tuned for part three of our Getting Started guide where we’ll be manipulating our view to add and remove data.

About the Author: Edd Turtle
Edd is a PHP and Go developer, specialising in building scalable web applications. He enjoys blogging about his experiences, mostly about creating and coding new things he's working on and is a big beliver in open-source and Linux.